Thursday 28 November 2013

Family - Cousin

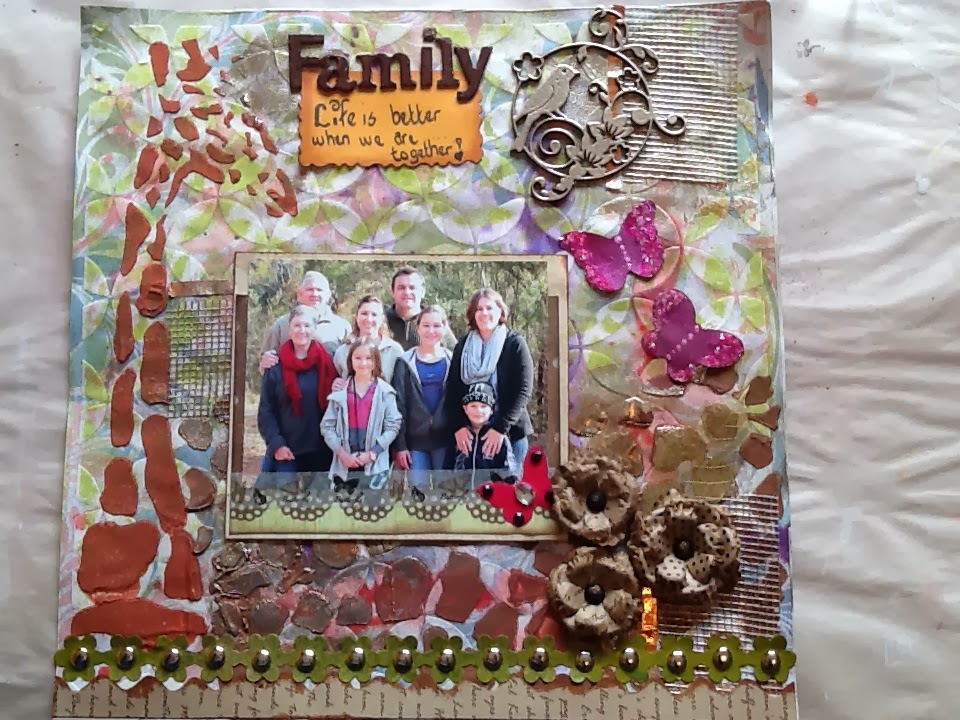
For our Creative craft challenge we had to do "texture", and the more you get to know me you will realise since discovering this wonderful art form called texture...well, I'm totally hooked! How can you not love how it changes ones pages... So what I did was took a pattern page that I liked but didn't love and used gesso and with my Heidi Swapp 12' x 12' stencil I created my background and dried it. Once dried I've cut out my own stencils of the giraffe and it's spots which I then used coloured gesso and placed my image on the page.Once dried I used my sprays to colour the background. To enhance the colours I added two dots and let it run down the page - one was purple the other red. I then randomly placed kiwi mesh & copper strips. I then used VersaMark and rubbed it in random spots so I could add the embossing powder. I covered the whole page with the embossing page and then just dusted off the excess and heated. When I was heating I loved the way the gesso bubbled in some spots adding to the effect. It then come to doing the embellishments - I backed my picture and added a gesso butterfly and whilst wet added the rhinestones. The 2 butterflies on the side I heat embossed and then added blushing rose powder to enhance its colour. On the wing tips they both have Diamond dust.
The chipboard bird is also heat embossed with liquid platinum, the same colour on the background heat embossing.  


I did enjoy the texture added to this page and most certainly would love to try this in my journal!
Hope you give it a go....
Hugs
Joan XXOO

Products I used


Twinklets - Diamond dust
Rangers embossing powders - liquid platinum
                                                 Rose. Quartz
Rangers liquid pearls - White opal (even thought I used white it changed colour to pink on the butterflies!!)
LuminArte' - Blushing rose powder
                      Burnt Umber in a spray
Tim Holtz - Vintage photo distress inks and re inkers
Tim Holtz: Adirondack color wash - Red Pepper
                                                            Purple Twilight
Dylusions - Squeezed Orange
                    Dirty Martini
                    White linen


Trip To The Moon

Well it most certainly has been awhile... And yes I have been busy - crafting!! That's oh so more important than housework or Xmas shopping!! So part of the Creative dreams art journal swap was I had to do a journal and the theme was "Anything" ... It certainly does leave it open to a whole world of possibilities but I have had this idea in my head for a while to do a scene for the movie "Hugo" so I do hope I could I can do it justice... I got the picture and printed it and then did a mirror image so I could have the same on the other page of the journal.

I started with music paper and covered the back, once dry I painted with lime green and white. And then before it dryer I sprinkled glitter over the page. Once dry I used matte medium over the page. I then glued down silver stars randomly and stamped music notes over the back of the page. I then found the middle of the page and stuck down my moon, making sure that they where level on both pages. Again I used matte medium once it was all stuck down. With my cuttlebug I cut out 4 film strips. I used a lady stamp and an Eiffel Tower then drew in the building. I stamped he clouds with cloud paint and drew around them with a silver marker.


I did enjoy doing this page it most certainly was easy but had additional techniques which I wanted to try and enjoyed!!
Thanks for stopping by hope you enjoy XXOO
Joan

Monday 4 November 2013

Eggshell Dairy

Being in New Zealand I have learnt MANY new techniques! both from YouTube, classes and friends I have gained in the scrapping, mixed media industry, I have learnt to play with different textures and something I have tried is eggshells...Yes, eggshells I have done both art journaling with it and I have tried it on a cover which I'm going to share with you today... But if you aren't a patient person then this isn't for you or you need to do it whilst working with another project on the go! It's really a rewarding project when it's finished as the textures are delightful - I loved the look and so love the feel!! So get your patience on and lets get started... You going to have to start to collect eggshells so.


Next time you have eggs keep the shells the more you keep the better I always keep every eggshell, leftovers can always be thrown away when you are finished but once you enjoy the technique you wont throw the left overs away! And like me you just keep collect, my husband cooks and he knows not to even throw 1 shell away or it cause the roof to come crashing down on him...LOL!  Once you have your eggshell, under slow running water peel the membrane of the egg off but be  VERY gentle as not to crumble the shell. Peel it slowly so as to try and keep the membrane peeling of the inside of the shell. If you are struggling then gently ruby it with the water and you will feel it crumble away in you hand until all the membrane is clean from the shell.  Then you have to leave it to dry for up to 6-8hours. You can also leave it up to 4hours(sometimes quicker, my tumble dryer was going and I found it seemed to speed the time up) in a hot window sill with no moisture - you will need to keep lifting them from the plate so that they don't stick to it.


Once the eggshells are dry you can use a good PVA glue on the cover of your journal and start to  place it over the cover. at this point you will need to crack the shells to ensure that it is "flattish", you will also place the eggshells cracked dark side up. Let it dry. It is important to let it dry.Don't use a heating tool as the eggshells tend to lift. I do mine just before I go to bed and when I get up I mod podge it!


 Apply a thick coat of Mod podge matte over the eggshells. leave to dry. Make sure that the glue is dry as if it isn't dry the eggshells will move whilst applying the mod podge. Don't use a heating tool it will bubble and the eggshells lifts. The thicker your mod podge the better as at this point you will be creating a good barrier for both the eggshells and the paint we will be putting on. Mod podge dries quickly I put it on before taking the kids to school and when I got home I found it was almost dry ...90% so I chose my colour to paint and went ahead and painted.
 
I decided on a Brilliant red - Reeves acrylic. You will need to apply the paint thick over the shells. This takes REALLLLLY long to dry once again you can't use your heat tool due to bubbling. Let it dry over 18hours - yes that is how long it will take and yes that is how thick the paint will need to be. remember eggshells are porous and the absorb is high. Once the paint is dry and if you want a gloss finish you can apply a gloss mod podge for your shine. You can then draw, write your possibilities are endless! I decided to stamp a bunting on paper cut it out and stuck it on then went and added my flower with leaf's and heat embossed my butterfly. I finished my dairy with the ribbons on the binding to add colour and femininity for me....Love it!!!
 
 
Loved doing this project hope you enjoy the challenge and try it next time you do a page or a journal!!
 
Cheers for know:)